Search This Blog

Wednesday, June 25, 2014

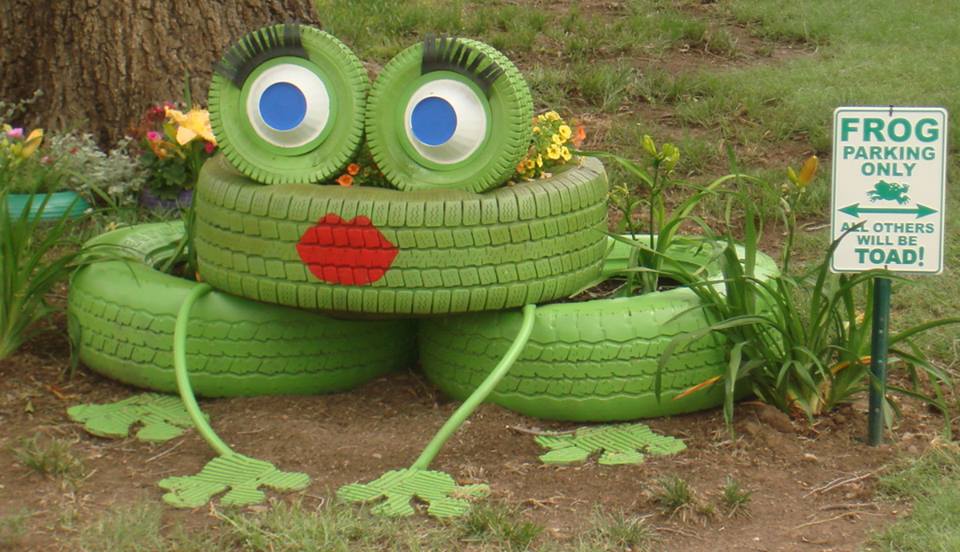
“Frieda La Frog” made from Recycled Tires


How to Make “Frieda La Frog” From Recycled Tires


Supplies

  • 2 car tires and one larger truck tire
  • 2 small tires with rims (from cart, wheelbarrow, or mower).
  • 4 plastic bowls
  • Tire inner tube
  • Garden hose
  • Recycled rubber doormat
  • Lid from a broken storage tote
  • Duco Cement
  • Silicon caulk (paintable)
  • Spray paint – green and white
  • Brush paint – Red and blue

 Tools:

  1. Power drill with ½” bit
  2. Utility knife
  3. Scissors
  4. Paint brushes
  5. Q-tips
  6. 2x6x8 piece of treated lumber
  7. 3” deck screws
  8. Long galvanized nails

Instructions

1. Clean tires and let dry.
2. Select which side of the large tires will be down.  Drill 4-6 holes in that side of each tire to allow excess water to drain.
3. Cut storage tote lid about 1-2” bigger than largest tire opening.  Poke 3-4 holes in it for drainage, and work it into the tire to cover the bottom hole.
4. Use utility knife to cut 4 feet from rubber door mat.  I drew the first with a silver Sharpie and cut it out, then used it as a template to make the others match.
5. Lay all the tires, feet, hose, and 2 of the bowls out on drop cloth and start painting!  I used Valspar flat spray paint/primer-in-one, in “Tropical Foliage” color.  It took about 5 cans.  I didn’t paint the underside, since they wouldn’t be visible.
6. Paint the other two bowls white – I used Rustoleum flat white.  Once dry, paint the bottom of these two blue.
7. Using Duco cement, glue the bowls into the rims of the small tires.  The white bowls are the eyeballs, and the green ones on the back give the eyes a bulgy look from behind.
8. Spread a bead of silicon caulk on joint of bowls and rims.  Once it dries, touch up the paint.  Spray the caulked part on the back of the eyes.  To touch up the front, I spray paint onto a piece of wax paper or foil and use a Q-tip as a brush.
9. For eyelashes, cut a wedge-shaped section of inner tube, then use scissors to make cut from the inner edge to about 1-1/2” from outer edge.  Use Duco Cement to glue into the space between the tire and the rim.
10. Using red paint and brush, add mouth to largest tire.
11. Now the slightly tricky part – making the eyes stable in their mounting.  First, set the eyes on the “head” tire and cut two slits in the large tire with a utility knife.   This allows the eyes to sit down into the tire a bit.
12. Insert the piece of lumber into the head tire under where the eyes will sit.  Install deck screws at an angle through eye tire, head tire, and into lumber. Do this with both eyes.  They will have a little wobble to them,         but not much.  Later, when this tire is filled, stability gets even better.
13. Put it all together!  Lay the 2 body tires side-by-side on the ground.  Fill them to within an inch of the inner circle with soil.
14. Place head tire on body tires, centered and pulled forward a couple inches.
15. Lift head slightly and slip one end of arm hose on each side, between tires.
a. Cut off arms to length and secure to ground with galvanized nails as mini-stakes.
b. Place feet in position, and use nails again to hold in place.
16. Fill top tire with soil to within an inch of the inner edge height.
17. Plant with flowers of choice.  I chose to use perennial daylilies in the bottom tires, and annuals in the top, so I don’t have to replant more than one each year.
This is how I did it, but if you make one, let your imagination go out and play … get silly or get serious, but make it YOURS!
Finally, and most important, THANK YOU SO MUCH for your interest in Frieda La Frog.  I’ve told her how popular she’s become, and I’m a little worried … she’s demanding an entourage, Ray-Bans, and one of those silly little purse-sized dogs …

Happy Gardening!

Lynn Lapka


*^*^*^*^*^*^*^*^*^*^*^*^*^*^*^*^*^*^*^*^*^*^*^*^*


as seen on and copied from facebook 
 
 
eliquified.com

Saturday, December 14, 2013

Homemade Finger Paints

Homemade Finger Paints


3tbs sugar
1/2 tsp salt
1/2 cup corn starch
2 cups water


combine ingredients in small saucepan. warm until mixture thickens. cool & pour in containers. add food coloring to create desired colors. enjoy!!


*someone suggested using Kool-Aid for coloring...and it smells good, too!


*^*^*^*^*^*^*^*^*^*^*^*^*^*^*^*^*^*^*^*^*^*^*^*^*


as seen on and copied from facebook 
 
 
http://tinajo.origamiowl.com/

Tuesday, December 3, 2013

Candy Cane Wreath

Love This!!!

What an awesome gift to give people for their homes!!! This is a wonderful conversation starter as well as a gift!

✿♥✿ Candy Cane Wreath ✿♥✿

ribbon
large center decoration
10 small decorations
hot glue gun w/glue
20 candy canes

arranged as shown in photo
tie them two by two facing each other,
you can hot glue a decoration to the center to keep the ends together
glue small round ornaments to each set you tied.
Hang with ribbon.
Enjoy


Christmas Wreath


*^*^*^*^*^*^*^*^*^*^*^*^*^*^*^*^*^*^*^*^*^*^*^*^*


as seen on and copied from facebook 
 
 
http://tinajo.origamiowl.com/

Tuesday, November 26, 2013

‘Soft as a Cloud’ Playdough…using only 2 ingredients!

‘Soft as a Cloud’ Playdough…using only 2 ingredients!


All you need is:

1 part conditioner
2 parts corn flour/corn starch
Food coloring (optional)

That’s it!

Step 1
Pour your conditioner into a bowl (we used a home brand conditioner – note that not all conditioners are of the same consistency so you may need to add a little more or a little less corn flour to get the right consistency for you)
Step 2
Pour in the corn flour/starch
Step 3
Give the mixture a good stir
Step 4 (optional)
Add a few drops of food coloring
Step 5
Mix well using your hands. This part smells delicious!
Step 6
Have FUN molding, squishing, shaping and playing with your new *Playdough*!


http://pagingfunmums.com/2013/11/01/soft-as-a-cloud-playdoughusing-only-2-ingredients/


*^*^*^*^*^*^*^*^*^*^*^*^*^*^*^*^*^*^*^*^*^*^*^*^*


as seen on and copied from facebook 
 
 
eliquified.com

Sunday, November 24, 2013

Design your own Christmas Bulbs

Design your own Christmas Bulbs


I love this! Such a cute idea and a great way to spend time with the kids!

Put a piece of crayon in a clear Christmas bulb, use a blow dryer to melt the crayon while turning the bulb to distribute the color!!


***************
Other suggestions from facebook replies:

Daidre S. ~ I tried this last weekend with my kids. A few tips:
1. do not use plastic bulbs, they melt(duh moment there) luckily we bought glass ones too!
2. One crayon color only. Even if u try one color at a time, it all melts together in the end.
3. While swoo
shing the melted crayon around watch out for the hole at the top, you don't want second degree burns.
4. Wear gloves! Thick ones! That bulb gets hot and stinky!!!
5. Basically a do it yourself project with no kids.
But hey, I got a BROWN Christmas bulb after all my trials and tribulations!!
Oh, and I had to use our gas stove to actually melt the crayon, my blow dryer was shooting sparks at the glass bulb. My daughter thought it was cool she seen "lightening!"


Julia M-M ~ This works WAY better with nail polish. The cheaper the better as they are more runny. Do one color at a time though or you'll get a weird color pool at the bottom. If I want sparkles, I'll start with clear and sprinkle in the glitter, let it dry then add whatever is next. It's stinky but they turn out beautiful.

Aimee M. ~ I done this with my family tonight but we used paint. Depending on where you store Christmas stuff the summer heat might make them melt again in balls. Making a mess or getting on whatever they are stored with. The paint worked well but make sure u turn upside down in plastic cup to drain. If u like the design after drained good use blow dryer. Some of mine I left to long in cups draining turned almost a solid color. So after most paint was drained I used blow dryer to set the marble look. (Instead of leaving over night to drain and dry.) Also when putting paint into glass balls - I used nickle size amount of each color or more and kept tapping ball in palm sideways over and over making paint swirl. Ours turned out great and the smaller kids can do these with plastic and without getting burned with wax too.


*^*^*^*^*^*^*^*^*^*^*^*^*^*^*^*^*^*^*^*^*^*^*^*^*


as seen on and copied from facebook 
 
 
http://tinajo.origamiowl.com/

Notes Throughout the Year

Notes Throughout the Year


Start the Year with an empty jar; fill it with notes about good things that happen throughout the year. Then, on New Year's Eve, empty it and see what awesome stuff happened that year.


*^*^*^*^*^*^*^*^*^*^*^*^*^*^*^*^*^*^*^*^*^*^*^*^*


as seen on and copied from facebook 
 
 
eliquified.com

3D Paper Snowflake


3D Paper Snowflake

What you need:

Tools:
  • scissors
  • ruler
  • pencil
  • stapler
  • eraser

Supplies/Ingredients:
  • 3 sheets of A4 paper
  • wood glue

Directions:

Take 3 sheets of A4 paper. Fold them in half (try to be precise) and then unfold.

Cut the sheets along the line of folding. You’ll get six smaller sheets of paper in total.

Take those six sheets and fold each one like this: take a short side and fold it up against a long side to make a triangle of sorts. Cut the bottom rectangle off to make a perfect square. (In other words, cut each of the 6 smaller sheets into perfect squares.)

Fold all squares diagonally.

Measure off 3 segments (each is 2 cm/0.8 inch long) on the longer edge of the triangle. Start from left corner. (Mark at 2 cm, 4 cm, and 6 cm.)

Now, fold you(r) triangle into a smaller one, with the measured segments side facing you. (Fold in half.)

Draw cutting lines parallel to the diagonal edge (the long side) of the triangle (use marked points).

Mark a point in 1cm/ 0.4 inch distance from side edge of the triangle. Draw a guiding line parallel to this side of the triangle.

Make diagonal cuts along your guiding lines. Cut only to the distance line. (1 cm from the other short edge of the triangle.)

Erase all guiding lines.

Are you done with cutting? Let’s go back to the square! Unfold your triangle twice.

Time for rolling! Take two innermost paper points together to form a tube. Stick them together with a glue (put a little bit only on the corners).

Flip the whole thing to the other side.

Take the next two paper points and pull them on the opposite side of the first tube. Stick them with the glue as before.

Repeat the procedure with flipping the paper and joining the paper points together on opposite sides until all paper points have been joined.

Yay! One of your six basic pieces is ready. Repeat all the steps with the other triangles.

Now, after you’ve prepared five other pieces, join three of them together at the top with a glue. You’ll get two, three-armed pieces.

It’s time to staple together previously joined two pieces.

You’re almost done :) Now you just need to staple together every pair of arms.

You’ve made it!


http://www.handimania.com/diy/3d-paper-snowflake.html


*^*^*^*^*^*^*^*^*^*^*^*^*^*^*^*^*^*^*^*^*^*^*^*^*


as seen on and copied from facebook 
 
 
eliquified.com